Wednesday, 8 October 2025

TweakUI – PowerToys for Windows.

The link I had to TweakUI for win98 and a guide by R. Pearson had died so I wanted to preserve a copy. In the process of finding a backup of that old page and getting more useful versions of TweakUI for 95 and XP I came across another nice guide to TweakUI by Alan Zisman. The download links were also dead on that site. So in the name of preservation I have created a facsimiles of the contents of those guides here! Also fresh links to the downloads all in once place. Thanks again to Rodney A. Pearson and Alan Zisman. I highly suggest you take a look at both of their websites which are fantastically web 1.0!

Downloads

TweakUI

TweakUI is a powerful utility that you can use in Windows 95, 98, or NT to tweak the user interface. You can use this utility for a variety of tasks, such as enabling or disabling the CD-ROM auto-run feature, log onto a network automatically, and more.

TweakUI was originally written for Windows 95, but was not actually included on the Windows 95 CD (you had to download it). TweakUI was included on early Windows 98 CDs, but it is not included with Windows 98 SE CDs. For whatever reason, the utility is not installed during the Windows 98 installation. This tip shows you how to install it, and how to use some of its features. In any case, TweakUI can be downloaded from a variety of download sites for 95, 98 or NT. As a matter of fact, you can click here to download a self-extracting compressed set of TweakUI files.

Step by step

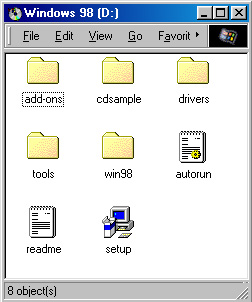
  • TweakUI is included on the Windows 98 CD. The figure to the right shows a directory listing of that CD.

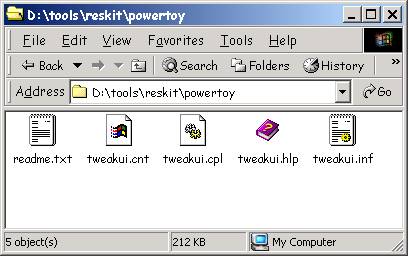
    TweakUI is stored in \tools\reskit\powertoy. Double-click on the tools icon, then double-click on the reskit icon, and finally double-click on the powertoy icon.
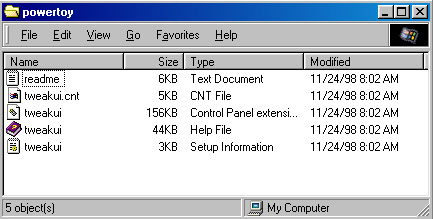
  • The figure to the right shows the contents of the \tools\reskit\powertoy subdirectory. (Note: When you display a directory, or folder, you have several options for the setup of the display. The figure to the right shows Details; other options are Large icons, Small icons, and List. To change the format of your display, select the desired option from the View menu option at the top of the window. Details, as the name suggests, provides the most information about the listed files.)
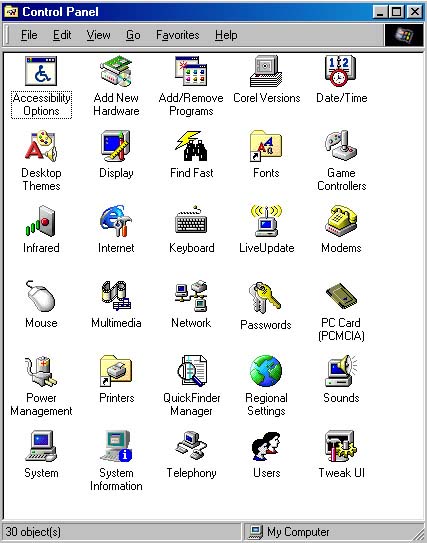
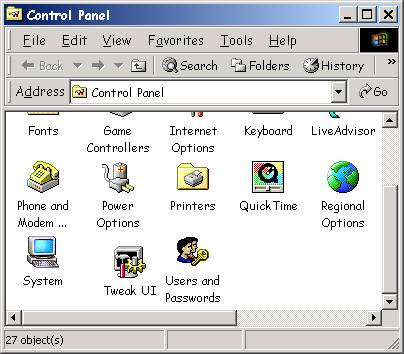
  • Installation of TweakUI will add a TweakUI icon to your Control Panel window (shown in the bottom right corner of the figure to the right). To access TweakUI, open Control Panel (double-click on My Computer on your main desktop, then double-click on Control Panel) and double-click on the TweakUI icon.
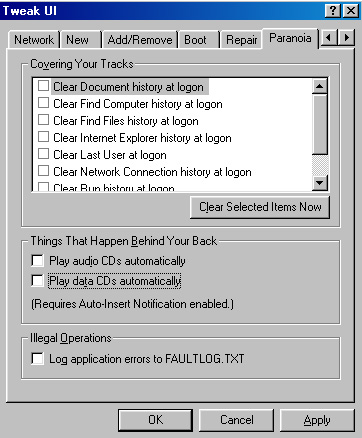
  • The figure to the right shows the Paranoia tab window. This window contains (among other items) two checkboxes that you can use to enable or disable the automatic playing of CDs (Play audio CDs automatically and Play data CDs automatically).

    The Paranoia window lists several options which might be particularly beneficial to paranoid users. The frame labelled “Covering Your Tracks” lets you turn on features which will automatically delete or clear files during the boot process. Note, however, that covering your tracks can slow down the boot process, so you might want to give careful consideration as to whether these features should be enabled or disabled.

Please let us know if this tip has been helpful. Email to rpearson@cobilan.msstate.edu.
Date posted: 11/15/99

� Original page link from wayback machine https://web.archive.org/web/20240527002828/http://misweb.cbi.msstate.edu/~rpearson/tips/tweakui.html

TweakUI to tweak the user interface

By Alan Zisman © 1999, 2002

Microsoft, who in their infinite wisdom and mercy giveth and taketh away has both given and taken away a powerful, free tool for helping to overcome a host of Windows 95/98/NT/2000/ME annoyances–TweakUI.

TweakUI is a Control Panel add-on, that has been developed by Microsoft programmers, and distributed in various ways by Microsoft, while at the same time, never quite being an official part of Windows, or officially supported by MS. There are several different versions–one for Windows 95/NT 4.0 and one for Windows 95/98/NT if Internet Explorer 4.0 or later is installed–the difference being the changes resulting from IE4’s Active Desktop, a so-called TweakUI 2000 (aka version 1.33) and a version for Windows XP. The XP version is totally different, and isn’t included in this discussion.

The original, Win95 version can be downloaded from Microsoft at: http://www.microsoft.com/windows95/downloads/contents/WUToys/W95PwrToysSet/Default.asp. You’ll find TweakUI-95 along with a number of other possibly useful little utilities. Despite its name TweakUI-95 works fine with Windows 98, 98SE, ME, NT 4, etc.

The Win98 version was included on the Windows 98 CD, in the D:\Tools\Reskit\Powertoy folder, but was removed from the Win98SE (second edition) package. The Windows 98 version can be used with Windows 95 or NT 4.0 if Internet Explorer 4.0 or later have been installed, and works fine with Win98SE, ME, and Windows 2000. It has been replaced, however, by TweakUI 1.33 (aka TweakUI 2000) which can be downloaded from: http://www.download.com/Tweak-UI/3000-2341_4-2830963.html

(Both the original Win 95 and ver 1.33 versions can be downloaded from my website:http://www.zisman.ca

The very different version for Windows XP can be found, along with other XP Powertoys at: http://www.microsoft.com/windowsxp/pro/downloads/powertoys.asp

Installing Tweak UI

No matter how you got a copy, it installs the same way–locate the TweakUI.inf file (somewhat difficult to do with Windows’ default of hiding file extensions, since there are several Tweakui.* files–here are the files with extensions turned on:

As you can see, the tweakui.inf file looks like a Notepad document with a little gear on it… important if you have file extension-viewing turned off (the Windows default)– in that case, you see four different icons all with the name ‘Tweakui’.  Right-click on the inf’s icon, and select INSTALL from the popup menu. You may be asked for the location once or twice–browse to the correct folder. During the installation, you’ll get a help file on screen–read it, then shut it down. When done, you won’t find an icon for TweakUI in the Start Menu–it installs as a Control Panel icon. (The WinXP version installs into the Start Menu and not the Control Panel– just one of the ways it’s different).

Start it up by double-clicking– you’ll see a dialogue box with multiple tabs–the Win95 and 1.33 versions arrange them in several rows, while the Win98 version has a more awkward arrangement, showing a single row with arrows at the right hand end to move forward or back, to view additional tabs.

TweakUI 1.33 on Windows 98SE
TweakUI 1.33 on Windows 2000

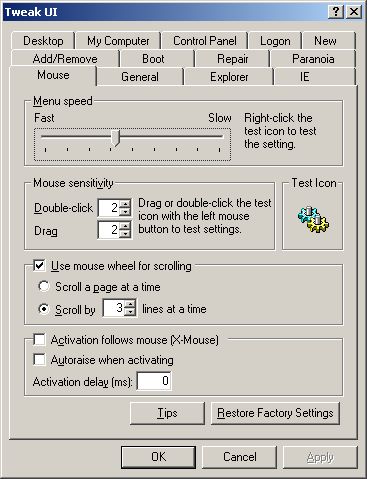
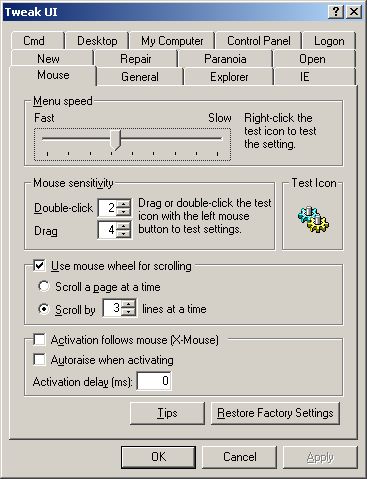
Here are pictures of TweakUI 1.33 installed on Windows 98SE and Windows 2000 systems- note that there are some differences in the contents of the various tabs.

Mouse tab

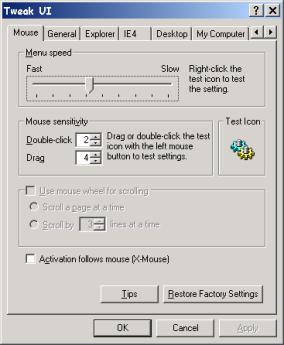
You can speed up how fast menus drop down (or open sideways, as in the Start Menu), and test the various speeds by right-clicking on the Gear picture. You can adjust mouse sensitivity for double-clicking and dragging (and again, test your changes). If you have a wheel mouse, you can set how much is scrolled at a time. The X-Mouse setting is more typical of Unix systems–an items is selected by simply resting your mouse over it, rather than by clicking it. Note that you can experiment freely, since you can restore the factory settings with a click of a button.

General tab

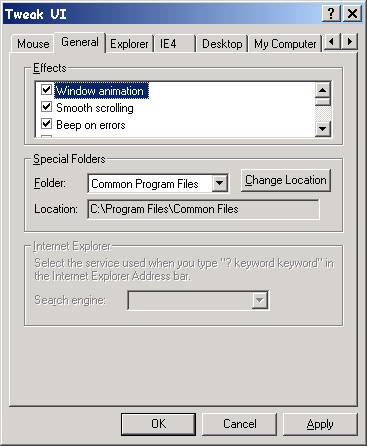
The W98 version has lots of settings in the Effects section, while the Win95 version just has the top 3–though I tend to leave them all alone. Similarly, I pretty much ignore the options to reset Special Folders–the default location for Program Files, and more.

If you’ve mysteriously got the Windows version and build number appearing the lower right-hand corner of the screen, you can turn it off here–it’s the last item, hidden in the Effects list.

Explorer tab

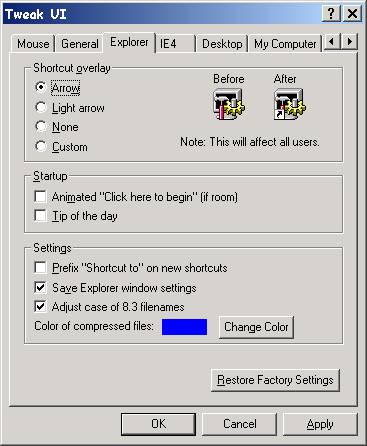
More useful–this one, for example, in the Settings section, lets you turn off the annoying ‘Prefix ‘Shortcut to’ on new shortcuts’. Hallelujah! You may be tempted to use the top section to turn off the arrow on shortcuts–resist tempation. It’s actually important to be able to easily tell the difference between an icon that’s a shortcut, and one that’s an actual program or document file. Deleting a shortcut is no big deal–the actual file remains. Deleting the real file by mistake, however, could have serious consequences. Leave the shortcut arrow alone!

IE or IE4 tab (Win98 and 1.33 versions only)

This is called the IE tab in version 1.33.
Again, a scrolling list of options, available even if you’re using a version of IE later than 4: You can use it to easily enable or disable Active Desktop. Turn off adding documents to the Start Menu’s Documents list. Clear the various history lists (Document, Run, etc) automatically on exit. You can also turn off showing Documents or Favorites at all in the Start Menu. (I leave Documents, but turn off the Favorites list). In version 1.33 you also get an item allowing you to turn off undefined ‘Shell Enhancements’– this removes the Win98-style interface additions– primarily the Toolbars (little-icons beside the Start button), making your interface more like the original Windows 95 one. 

Desktop tab

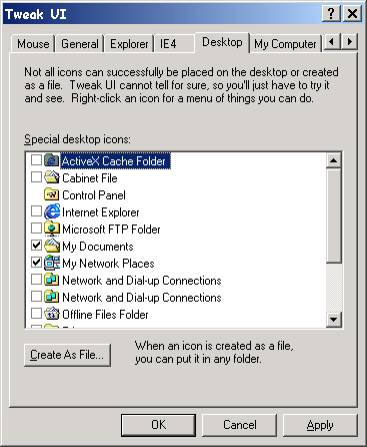
Finally–a way to turn off some of those sticky desktop icons, that won’t easily remove, even though you never use them–for instance, the Microsoft Exchange InBox in Win95– or the Internet Explorer icon. Or, if you don’t want it visible, the Recycle Bin. If, before unchecking an icon, you Create it as File, you can store it in a different folder, but you can always get the icons back, if needed, simply by rechecking it, here.

Note that you can’t turn off display of My Computer. And no, I don’t know why some icons appear twice… but I’ve sometimes found that with two Internet Explorer icons, (for example), one will work to start up the program while the other one does nothing if double-clicked!

My Computer tab

A list of possible drive letters, A-Z, even if most of these are not currently available on your computer. Unchecking a letter means that that drive letter no longer appears in My Computer, or in the File/Open and Save dialogue boxes of your applications. Oddly, the unchecked drives still seem to appear in Explorer– turning off drive C:, for example, means that users won’t be able to easily (and perhaps accidentally), save to their local hard drives–but can still save to designated network drives, or floppy drives. I’ve done this on my student machines, where I don’t want students saving to the hard drive. (Even though the icon is hidden, you can make an Explorer window to a hidden drive appear by typing the drive letter in the Start Menu’s RUN dialogue).
Note that if you uncheck any drives, you can no longer edit the Start Menu by right-clicking on the Start Button and choosing Open or Explorer from the popup menu–those items are greyed out. As far as I can tell, this is a bug, not a feature but continues through version 1.33. You can still edit the Start Menu by right-clicking on the Taskbar, and choosing Properties from the popup menu.

Control Panel tab 

This lists the various *.CPL control panel files, and lets you unselect ones you’re unlikely to use–they will no longer show up in the Control Panel. For instance, you may not need to see the Game Controllers control panel icon on a notebook with no game port. Or the Regional Settings control panel. Or the ODBC Data Access control panel installed by Microsoft Office, if you’re not accessing these sorts of large corporate databases. Or the Telephony control panel. Turn them off and remove some clutter– you can always easily get them back it you need to!

Network or Logon tab (Win 98 and 1.33 versions only)

A single option–to automatically logon. It notes, however, that any password you list here is not encrypted, and can be viewed in the System Registry, using Regedit. Still, this is especially useful on a single-user computer running NT or Windows 2000, which insist on a user logon (unlike Win 95/98)– as it can logon automatically for you at each bootup. It can also be useful on a Win9x system if it connects to an NT/W2000/XP network to share files or printers.

New tab

When you right click on the Desktop or elsewhere, you may notice NEW as an option in the popup menu– clicking on it gives the useful New Folder option, as well as a bunch of new, blank documents for various programs. Does anyone actually create new documents this way? By default, you may even have the option to create blank documents for programs that you don’t even own. This item lets you remove items from the list. You may want to leave the New Briefcase item in the list–that way, you can delete the Briefcase from the Desktop, and still have a way to get it back in the unlikely eventuality that you want to try it out someday.

Add/Remove tab

This resembles the list in the Control Panel’s Add/Remove Programs item– but unlike that one, it doesn’t remove any programs. What it does, is remove an item from the main Add/Remove list–useful in case a botched up program uninstallation fails to remove the item from the Control Panel list (or you manually deleted a program’s folder, rather than using the Control Panel item to remove it the right way!) If you have a Windows 3.1 program that included an Uninstall icon, but doesn’t automatically add itself to the Control Panel list (MS Works 3.0, for example), you can click on the New button, to add it to the Control Panel list–first, find the properties of the Uninstall icon, and copy down the command line–then you can enter the exact same thing in the Command field here–so that choosing it from the Control Panel will run the correct program.

note: If you’ve installed the current 1.33 version on a Windows 2000 system, this tab does not appear- though it does appear with that version of TweakUI installed onto a Win98 system. Curious! However, if you try to remove an application in Win 2000’s Add-Remove control panel, and the uninstall doesn’t work, Win2000 offers to remove the application from the Add-Remove list, so this TweakUI item is less needed in this case.

Boot tab (Win95/98 only)

This lets you turn on or off a variety of settings at system startup–whether the F8 function key, for example, can be used to call up the boor menu, whether Win9x starts up automatically, whether the Microsoft cloud screen appears at startup, and whether you can boot to your former operating system (only on machines that were upgraded from DOS/Win 3.1). You can also set it to always show the boot menu, for a set number of seconds–useful in some trouble-shooting situations.

Repair tab

Very useful! Ever had desktop or System Tray icons get munched somehow, and show the wrong icon? Pick the Rebuild Icons item here, and click the Repair Now! Button, and you may be able to fix them. Also useful, from the dropdown list is to repair the Font Folder, if you’re having trouble displaying or accessing fonts. The other items are less commonly needed.

Paranoia tab

Aptly named! This lets you automatically cover your tracks by emptying the lists of Recent Documents, Run, Last User, and more whenever the system restarts. Nice to set on computers used by multiple users– so Johnny doesn’t get to see what documents Mary was working on. As well, for no good reason, you can set audio and data CDs to play automatically–or not. (Note–for this to work, you need to have Auto-Insert Notification turned on– If this isn’t working for you, go to the System control panel, and go to the Device Manager tab. Find your CD-ROM drive in the list of devices, select it, and click the Properties button. Go to the Settings tab and make sure [x] Auto-Insert Notification is checked.

More…

There are a number of tabs that I haven’t covered– hopefully the options are either obvious, trivial, or so complex that most users can safely ignore them! Feel free to check them out, however, and if you have any questions, email me.

And that’s it– a lot of items that you can happily ignore, but several that can make your life much easier (turning off easy access to Drive C: for example, in a networked classroom), and some that simply clear up some common annoyances, such as the undeletable desktop icons, or the stupid ‘Shortcut to–’ prefix on shortcuts.


Alan Zisman is a Vancouver educator, writer, and computer specialist. He can be reached at E-mail Alan

� Original page link https://www.zisman.ca/tweakui/

Monday, 31 October 2022

Retro Game Wednesdays (Part 7)

2.5 Windows 98 Second Edition + Unofficial Service Pack

Since beginning this project I always intended to use a Window 9x based operating system for this build. However instead of just using out of the box 95, 98 or Millennium I decided to go with 98 Second Edition and also install the Unofficial Service Pack. By doing this I understood that I may loose some potential performance because of the extra demand on the system from the extra security updates and features. But the main reason I decided to do this was it also meant better compatibility and stability. The last thing you want when you’ve invested hours in to a game is for your system to be crashing unexpectedly all the time leading to a corrupted save.

Why not Windows 95? There are defiantly many people with strong feelings of nostalgia for Windows 95, but it’s not really the best for retro gaming. It’s limited functionality doesn’t give it much headroom for hardware or DirectX compatibility. While there are work arounds to get some games that require Windows 98 working in my opinion it is more effort than it’s worth. I also wanted to be able to play games all the way up to DirectX 8.1 as well as OpenGL and 3Dfx Glide games.

The Unofficial Service Pack contains almost every bug fix and update Microsoft released using the now defunct Windows Update feature in 98. It adds better hardware support and extra features which bring the operating system more in line with Windows ME and early XP’s capabilities. While I could just use Windows ME which by all considerations is just an updated version of 98SE there is much debate on it’s stability, so I just went with the tried and tested. The Unofficial Windows 98 Second Edition Service Pack version 3.65 which I’ll refer to as U98SESP3 is a really excellent way to get a stock install of 98SE up to snuff for retro gaming. When writing this there is a version 3.66 of the U98SESP3 available but some users have had trouble installing it, but it does seem a fix for that is to install 3.65 first and then 3.66 over the top. For the sake of this write up I’ll be assuming you are using version 3.65 as this is the version I originally used, if you are following along that is.

I found installing the service pack right after Windows has finished it’s setup and you have all the hardware drivers installed worked well to keep things from getting “complicated”. There are a few reasons it’s beneficial to have all the drivers installed before you begin updating. Windows 98 can be quite unstable when hardware isn’t configured properly or there are possible conflicts. The chipset drivers should also be installed, this means your system will be running at maximum performance with features like caching and hard disk DMA access enabled, this will greatly improve the time it takes to install the U98SESP3 and reduce the chance of a failed install. For more details on drivers for 98 they are covered in detail in the next section 2.6 Drivers and Windows 9x.

U98SESP3 has a couple pre-requisites of it’s own that must be met before it can be installed. The first one is an updated version of Internet Explorer and the second is an updated version of DirectX.

  • Internet Explorer 5.5 SP2 – Must be installed before running the U98SESP3 setup. If you don’t the installer will either fail or will complete but will break File Explorer, making you unable to browse files. Version 6 or higher can be used but I would stick with 5.5 for performance reasons.
  • DirectX 8.1a / 8.1b / 8.2 – The U98SESP3 setup will not allow you to install some aspects if the version of DirectX installed is “out of date”. While some suggest installing version 9.0c of DirectX, I’ve found it slows down performance considerably and can cause some stability issues with older games.

Upon launching the Unofficial Service Pack’s executable U98SESP3.EXE it will take a little while to extract itself. (For some reason it does this to a folder inside of C:\WINDOWS\TEMP and will delete itself upon a system restart, which is annoying because several restarts are required during the installation process. I found it beneficial to copy the folder out of TEMP after launching to a safe place so I could run the component selector again at a later time.)

Once extracted it will open a readme/agreement page detailing the install process and warning you not to have any important data on the machine, agree and continue. Next you are met with the component selector the entry “Main Updates/System Core Files (Install Separately)” is the bulk of the updates and must be done first and on its own. Select it and press OK, the system will close explorer and begin installing the updates with a progress window.

The system should restart as part of this process. You may need to run the installer again and wait for it to extract or open the component selector from the folder you moved (it’s the exe with the metal skull icon). You can now select multiple features as long as they don’t say (Install Separately), the only other features you really need are Active Directory Services Client Extension and the Time Zone Update. Active Directory Services will allow you to network 98SE with any SMB 1.0 compatible Windows computer, I’ve had success with Windows 3.11, XP, 7 and 10 and the Time Zone update just helps the system keep accurate time with current daylight savings.

With all the additional updates and components installed we should now have a nice fresh and stable 98 install to work with. All that’s left is to get Windows all tuned up with the best drivers and system tweaks to get the maximum performance out of your system. There are many things you can do to get the best performance out of 98 but by far the most important is using the best drivers for your hardware and best doesn’t always mean newest.

2.6 Drivers and Windows 9x (VXD vs. WDM)

While installing Windows it will have run a hardware detection wizard and setup drivers for your hardware, that is the ones it had drivers for at least. If your build is made of components released before or around Windows 98SE/ME chances are you’ll have working drivers installed automatically for most devices. However if your hardware supports 98 but was released well after you’ll need to track down drivers. Something to take note of is that while Windows will have installed (usually) stable motherboard/chipset drivers, they wont be the official ones and defiantly won’t provide support for all your motherboards features or the best performance.

Speaking of performance Windows 9x uses two different types of drivers, these being VXD drivers and WDM drivers. VXD drivers are preferred for their better performance and in most cases they are more stable, this is because they are the more mature type out of the two. Audio hardware especially benefits from VXD drivers, with much less CPU overhead and in some cases higher supported sample rates and 3D hardware acceleration. WDM aka Windows Driver Model drivers were newly introduced with Windows 98 and while designed to be more stable the reality was the new structure led to inefficient and sometimes unstable drivers.

2.6.1 Finding the Right Drivers

One of the first places you should look for drivers is the manufactures website, in a lot of cases they still host the hardware product pages and driver downloads. Now if you can’t find a driver/bios update on the manufactures current website it’s always worth giving the waybackmachine a go, this lets you view websites at an older point in time. Another essential place for retro hardware drivers is the VOGONS Vintage Driver Library which is a fantastic and curated library of hard to find and essential drivers.

If you are having trouble finding drivers because you don’t know the exact name of your hardware there are a few ways you can go about identifying them. One fantastic tool is the Windows 98 edition of CPUID’s CPU-Z, this tool will give you the model numbers for your CPU, motherboard, chipset, memory and GPU as well as the BIOS version info. You can always look at the model numbers on physical hardware too, the chipset packages on motherboards and the primary audio chip on soundcards are a good starting point if no name or model number is present on the silk screen printing on the PCBs.

2.6.2 Motherboard Chipset Driver

Motherboard drivers are amongst the most important to get right as these can enable DMA (Direct Memory Access) on hard disks and optical drives, as well as the full functionality of the AGP bus and USB ports. Chipset drivers can be confusing too, many distributable installers have silly names, poor naming conventions and completely unrelated version numbers. I have had on a few occasions installed the “latest” (highest version number) of a chipset driver setup only for it to make Windows completely unstable. The reason for this turned out to be the version number in the setup name didn’t refer to the version of the driver for that motherboard, but instead it was for the chipset family as a whole and was intended to be used with a completely different motherboard.

These kind of issues can be hopefully be avoided by using drivers from the provided installation discs if you have them, getting them directly from the product support page online (if they still exist) or by using the way back machine as I mentioned previously. However it’s not always as simple as just looking back at the history of a products support page, while the page might be cached and viewable the downloads themselves might not be. If this is the case and you can’t download the driver you can still find the file name in the download link and then search for that. There are a lot of driver backup websites some of which are legit but bear in mind that there are many which are not, a tell tale sign they are not legit is if they constantly try to get you to install anything like “driver cleaners/update wizards” aka malware.

2.6.3 USB Mass Storage Driver

A very useful thing to get sorted early on is the USB Mass Storage Driver which will let you use thumb sticks and external drives over USB. The easiest way to do this is with nusb3x which adds support for USB 1.1 and 2.0 devices if you chipset allows for it. I personally used version 3.3e because that was what I had at hand at the time but v3.6e should be good. Take note that there is a reported possible compatibility issue with U98SESP v3.66, a work around is to not install nusb3x until after U98SESP 3.66 or to install the main updates from U98SESP 3.65 first and then install 3.66 over the top.

2.6.4 Third Party GPU Driver Replacements

Third party drivers mostly consist of modified official drivers although there are some 3Dfx drivers which are modified from source. There are several different reasons you might want to use a 3rd party graphics card driver. Along with tweaks and extra features 3rd party driver packs are geared towards practical real world performance, with modifications made to increase game and system performance over the skewed vanilla drivers that are optimized specifically for synthetic benchmarks.

When it comes to 3Dfx drivers I have to recommend the Amigamerlin 2.9 Voodoo Drivers as a straight up improvement to the official drivers. They work with the Voodoo 3/4/5 models and come with a nice set of control panel tools and there are other versions for Voodoo 1 and 2. It also includes a fantastic control panel and overclocking tool which exposes all of the registry variables for Direct3D, OpenGL and Glide rendering.

Yet another way to improve performance in some OpenGL based games is to use the 3dfx optimised “MiniGL” driver. I used the version 1.47 of the 3dfx MiniGL driver which is the fastest for AMD K6 systems. The MiniGL drivers are drop in replacement .DLL files which you can add to games which support them. An alternative to the MiniGL replacement DLL is the WickedGL replacement DLL. Unlike MiniGL, WickedGL was a commercially available software package with a installation/management tool which would identify games and install either the standard or high resolution WickedGL driver. It was also developed for much longer than MiniGL and can greatly improve framerates in some games.

There are also some great 3rd party driver replacements for Nvidia and ATI cards. I have had a great experience with the Omega Drivers for ATI cards and ATI Tray Tools their replacement for the Catalyst Control Center is heaps better. The download links for the Omega Drivers Archive page on the waybackmachine are still functioning including the cached mirrors of their host provider NGOHQ. Here are links to the cached ATI downloads and Nvidia downloads pages.

2.7 Power Tools and Utilities

All the power tools and utilities I’ve mentioned so far and a few extras that have been boundlessly useful while doing this project.
Check them out using the links below!

AmigaMerlin V2.9 Win9x Driver – 3DNow! optimised a greatly improved Voodoo 3/4/5 driver for Windows 9x.

CPU-Z Vintage Edition – Special Windows 98 version of CPU-Z, a great tool to help identify your PC specs.

CTU – Central Tweaking Unit is a tool for enabling Write-Combining amongst other things in Windows.

Cursor Hider – Hides the mouse cursor, a great fix for those Glide and OpenGL games which bug out and show the Windows cursor in the middle of the screen.

K6 SPEED by Kyle Brant Software – A utility for changing an AMD K6’s clock multiplier on the fly from the Windows desktop.

KernelEx – An addition for Win9x that extends support to some NT Kernel programs. Warning could cause problems, but let’s you run Firefox.

KillBox – Simple to use program that helps you delete stubborn files with bad permissions that Windows won’t delete.

MiniGL – The FalconFly Archive of 3Dfx’s optimised OpenGL driver for specific games. Version 1.47 for AMD K6-2/3.

Powerstrip – Resolution management and profile tool, also allows fine tweaking of CRTs.

Sound Control – For setting volume limits, default levels and mutes, and keyboard shortcuts. Great for returning volumes to non-ear bleeding levels when games change your WAV/CD volumes without asking.

TweakUI – A powerful utility that you can use in Windows 95, 98, or NT to tweak the user experience and fix the icon cache..

WickedGL – Improved performance in MiniGL/OpenGL games using a 3Dfx Voodoo 3 Card, also has a high-res flavour for 1024×768+.

Friday, 27 August 2021

Retro Game Wednesdays (Part 5)

2.3 System Performance in DOS

(Click the image above to view it larger with a description.)

For a PC made up of hardware from the end of the 90’s it performs as you would expect in DOS, it kills it. You can see a breakdown of the systems stock and overclocked performances in the SpeedSys summaries and DOSBench results in the images on the left.

All earlier era games that run in either CGA (320×200) or QVGA (320×240) resolutions run great, at either the frame-cap of the game or the refresh rate of the monitor. Some early games rely on the frame rate for in game timings and thus run too fast, for these I’m using the SETMUL tool to limit the CPU speed by reducing the multiplier or in some cases disabling the L1 or L2 Caches.

The late era DOS games that run in higher VESA resolutions like VGA or SVGA can vary in speed. Most VGA (640×480) games are perfectly playable when using stock settings, but while running under an overclock with write-combining enabled can be very smooth. As for games with support for SVGA (800×600) resolution they tend to be a bit slow under DOS even with overclocking or write-combining. This slowness seems to be a limitation of 3D rendering in software mode, with games which don’t make use of an optimised graphics library like Dirext3D, OpenGL or Glide.

I’ve tested a few games with DOS source-ports specifically designed to utilise MesaFX. An OpenGL based graphics library that takes advantage of 3Dfx’s Glide functions and allows for better hardware accelerated effects. There are also community patches for many games which improve their performance in similar ways.

The first is a port of Quake called QDOSFX. This source port is based of version 1.09 of Quake with a combination of enhancements from multiple other ports. This is possibly my favourite way to enjoy the original Quake episodes. Unlike glQuake this port does a excellent job retaining the dark and gritty software rendered look of quake, which is where I feel a lot of the charm of the game lies. It also has the benefit of running at higher resolutions, with greater performance and enhanced 3Dfx effects/lighting. Plus the kind of extra features we’ve all come to expect in more modern first person shooters; such as an FOV slider, on screen frame counter and better mouse look options etc.

Vanilla Quake at stock clocks and settings rendered at 640×480 finishes the Timedemo benchmark of 969 Frames in 74.4 Seconds with an average frame rate of 13 FPS. While the source port completes the same benchmark of 969 Frames in 13.2 Seconds with an average frame rate of 56.3 FPS. This is an improvement of approximately 425.5%.

See below the side-by-side comparisons of the Quake vs. QDOS and glQuake vs. QDOSFX. The newer ports are the images on the right of the slider.

Quake vs QDOS (Software) 640×480

glQuake (MiniGL) vs QDOSFX (MesaFX) @640×480

Super Mario 64 (MesaFX) Gameplay

Another game utilising the MesaFX library that I have tested is Super Mario 64. This port is based upon the reverse engineered SM64 codebase and is compiled for DOS. There is no benchmark but the game experience is smooth and enjoyable (even played with a keyboard). In some locations like the submarine it actually performs better than on the N64 version.

It’s interesting to see this game run natively on a 3Dfx system because back in the day UltraHLE’s N64 emulation took advantage of the N64’s 3Dfx graphics chip instructions and translated those calls to glide with very little overhead. While UltraHLE ran in Windows this port runs natively in DOS. Using write-combining even more performance can be gained.

System Shock (SSPTool) Gameplay

The last game I tested was a patched version of System Shock which not only looks better than it’s original DOS release but has more resolution options and modern control improvements. The mods I used were all part of the SSPTool mod pack and installer. This tool will let you select the modifications you desire and use a System Shock CD or GOG install to create a standalone modded install.

All of these ports ran incredibly smoothly at 640×480 and are even still enjoyable at 800×600 with Write Combining enabled. Checkout the comparison images and gameplay videos to see for yourself.

In the next part I’ll be covering networking, internet and multiplayer in MS-DOS. Also a little look at getting real hardware to connect to DOSBox on a LAN or over the internet.

Friday, 6 November 2020

Retro Game Wednesdays (Part 4)

2.2 DOS Drivers, TSR’s and Utilities

There are many drop in replacements for old DOS components thanks to the work of individuals or groups like the Free Dos Project. A fantastic resource is the Vogons Wiki page called Useful DOS utilities. I experimented with a range of Drivers, replacement TSR’s and Utilities until I settled on this combination.

XMGR – An Extended Memory Manager replacement for HIMEM by Jack R. Ellis.

JEMM386 – An Expanded Memory Manager replacement for EMM386 based on the source of FreeDOS EMM386. Made by Andreas Grech.

UMBPCI – A TSR which enables Upper Memory without switching CPU to Virtual 8086 mode. Handy for freeing up a lot of Conventional memory by loading other TSR to the Upper Memory while staying in Real Mode for older games. Currently maintained and updated by Uwe Sieber.

SHSUCDX – A Modern CD-Rom Driver replacement for MSCDEX, with caching, single-sector buffering and a smaller memory foot-print by Jason Hood.

CuteMouse – A replacement mouse driver. It is one of, if not the smallest memory foot-print mouse driver for DOS. It supports three button scroll wheel mice in DOS with very granular control over sensitivity. Made by Eric Auer and Daniel Nagy.

SetMul – A utility which changes the CPU multiplier, L1 and L2 cache operation on the fly within DOS for AMD K6+ processors. By gerwin on vogons.org. This is by far the most useful tool for getting older games to behave as they should.

k6wc/k6wcx – A utility for enabling Write-Combining on the AMD K6 by Uart. This massively speeds up 3D games. See this post I made previously on calculating your memory ranges and getting it to work.

Documentation for each of these utilities is included with the downloads from their respective sites. Most are quite simple to use and work in a similar manner to what they are designed to replace. However I have included copies of my autoexec.bat and config.sys because examples always help. These files will also contain my modified boot-menu.

A Quick Thanks
I’d just like to thank Philip Hoefer of Phils Computer Lab, Jack R. Ellis for XMGR, Andreas Grech for JEMM, Uwe Sieber and Andreas Stiller for UMBPCI, Eric Auer and Daniel Nagy for cutemouse, John H. McCoy and Jason Hood for SHSUCDX and finally all the folks at Vogons.org who keep these files alive, downloadable and documented. Without a community such as this my task would have been almost impossible.
Autoexec-Config.zip (16551 downloads )

A zip file containing copies of my AUTOEXEC.BAT and CONFIG.SYS.

Thursday, 5 November 2020

Retro Game Wednesdays (Part 3)

2.1 Disk Operating System aka DOS

There are many flavours of DOS; the most common was MS-DOS but there were alternatives like DR-DOS, IBM’s PC DOS or 86-DOS and now there’s the likes of FreeDOS, the free DOS Project which is a modern Open Source variant. Now the machine I intended to play DOS games with was also to be the one I’d use to run early Windows 9x games. So the simplest solution was to just spend some time configuring the underlying DOS that’s included with Windows 9x versions.

Windows 98 Second Edition is what I intended to use so that meant I’d be using DOS version 7.1. The first problem arose here with some DOS programs checking for a minimum version requirement on launch, but errored out because 7.1 is not a recognised value. This is likely to be because most software was not updated beyond the last retail release of DOS (version 6.22).

Luckily the tool SETVER has been included with MS-DOS since version 5 to configure any programs looking for specific DOS versions earlier than the one you’re running. You can add a program to the version table with the following syntax.

 SETVER [d:]:path][filename (number)][/delete][/quiet]
For example: SETVER C:\doom\doom.exe 6.22 

The flag /delete or /D can be used to remove a program from the version table and /quiet /Q stops any message being shown.

 SETVER C:\doom\doom.exe /delete 

To view all the entries on the version table you can run SETVER with no flags from the command line, this list can be long so you can use the “| more” option to paginate it. Once configured add SETVER to your CONFIG.SYS file using DEVICEHIGH.

 DEVICEHIGH=C:\WINDOWS\SETVER.EXE 

When I first configured DOS I used Phil’s DOS boot menu from his very helpful MS-DOS Starter Pack along side his DOS Mode Super Easy guide. These are fantastic and give you a clean starting point for boot-up configurations for Conventional, Enhanced and Extended Memory options. This also covers the setting up of the ‘Exit to DOS’ shutdown option in Windows. A essential resource for new users it helps you understand how the autoexec.bat and config.sys files are structured and how the drivers and TSR’s (Terminate and stay resident programs) are loaded.

As time went on I customised this menu with additional boot-up configurations, these allowed for better support for hardware and in some cases led to a more stable system. The Microsoft provided default memory managers and drivers for DOS are HIMEM (Extended memory manager), EMM386 (Expanded memory manager) and MSCDEX (CD-Rom driver). These however can be a bit clunky and can take up too much space in the lower memory bounds.

I started using other memory managers and drivers so I could run games and software I couldn’t with Microsoft’s old ones, at least not without having an excessive amount of system boot discs. These new drivers and memory managers help to free up more Conventional memory while still having sound, CD-ROM and mouse support. Being able to use Write-Combining along side EMS and XMS to improve 3D rendering times. Also in some cases it made games work that under HIMEM and EMM386 were prone to crashes or not even launching.

Wednesday, 4 November 2020

Retro Game Wednesdays (Part 2)

2.0 A Machine to Run Two Decades of Gaming (1989-2001)

I’ll going to start off looking at the oldest machine (referred to as ‘Retro Rig #1’ in my previous post), which I use for DOS and Windows 9x games. I’ll cover my hardware choices, any changes I had to make to those choices, discoveries I made while tweaking, optimising and fixing the problems that arose during usage. My aim was to build a single machine which could give an enjoyable experience playing a wide range of games, from early DOS all the way to the end of Windows 9x with the release of XP in 2001. I initially began building this machine in 2016 and made a thread on vogons.org at the time, since then its evolved somewhat.

To achieve this I needed a versatile processor at the computers core, which allows for good compatibility with speed sensitive 16-bit DOS software but also has enough oomph for demanding 32-bit 3D accelerated games. Both Intel and AMD had good offerings in 1999 with a range of Pentium II/III models and K6/K7 (Athlon) CPU’s respectively. The Higher end being the 600Mhz AMD K7 Athlon and the Intel Pentium III with more affordable mid-range chips sitting at the 450~500Mhz at almost two thirds up-to half of the cost in pre-built machines of the time. See the scanned system round-up from Issue 49 of PC Advisor dated October 1999.*

Mobile variants of these popular chips had speed-stepping or other power management technologies which allowed laptops to save battery by limiting performance and power of the CPU on the fly. It’s these processors which are perfect for older more stubborn DOS games which depend on slower speeds to function as intended. As far as I could tell the Intel chips needed to have their multipliers ‘unlocked’ and even then the multiplier value could only be changed in the bios on a system reboot. This left the AMD K6 mobile series denoted by a plus, in this case I used a K6-III+ 450Mhz.

It can downclock to 200Mhz or effectively even slower by disabling the L1 and/or L2 caches which makes it ideal for the slow stuff, but it can also overclock nicely to 500Mhz for a nice little boost. This speed pairs it nicely with a must-have piece of hardware from 1999 – a 3Dfx Voodoo 3D accelerator card for all games that support the 3D graphics API Glide. Luckily I still have my original STB Voodoo 3 3000 AGP 16MB which should hopefully run early Windows 3D games like a dream and even get a decently playable experience out of more demanding games like Quake 3 Arena or UT ’99. The Voodoo 3 also benefits from having drivers that are optimised for AMD’s 3DNow! instruction-set and many games received special 3DNow! patches to boost performance.

I now had a list of requirements to help me pick a suitable motherboard. It needed to be Socket 7 for the CPU, and it needed AGP as the variant of the Voodoo 3 I had was in that formfactor. While searching for candidates I stumbled upon a WYSIWYG computer that was retired from some factory floor on ebay listed as “Computer Cyrix M II 333Mhz 64MB SDRAM 4.3GB 2xISA 3xPCI”. No real details in the listing but I could see from the photos that it had an AGP slot and the CPU socket was branded with SOCKET 7, not bad for £30 for a complete system. When it arrived it did contain a Cyrix M-II as listed but to my surprise the motherboard was a Gigabyte GA-5AA which is a Super Socket 7 board.

The chipset is a ALi Aladdin V which before it’s release was not expected to be much compared to the likes of Intel, VIA or even SiS chipsets, based on it’s predecessor the Aladdin IV reputation which was a budget chipset used in some really cheap boards. The Aladdin V however ended up being a power house chipset which met all the requirements for the AMD’s Super7 specification plus more. It supported all current Socket-7 processors, the new Accelerated Graphics Port standard and the fast at the time 100MHz Frontside Bus. The Gigabyte website even claims it supports up-to 140Mhz FSB. The chipset also featured an internal L2 cache, cacheable 133Mhz fast memory SD-RAM support and a USB 1.1 header on the board. So by chance the Gigabyte GA-5AA ended up being a perfect fit for what I needed. This chipset guide article on anandtech.com was very insightful and helped me tremendously at the time when I was identifying the board and its features.

For memory I went with 256 Mega Bytes of 133Mhz SD-RAM since it’s supported by the chipset, later on I discovered that the memory bandwidth caps out at about 313MB/s so any value higher than that would just be diminishing returns. The storage devices I used were a MAXTOR DiamondMax 10 120GB Hard-Disk Drive for game storage and a generic SD to IDE adapter paired with a Samsung Pro 64GB SDHC Card. The Drive shows up as SINTECHI HighSpeed SD to CF Adapter and while it doesn’t get linear speeds as high as the HDD it does have a really low random access time at 0.78ms. I believe the model is SD35VC0 and has a FC1307A chipset. There are two optical disc drives; one 52x speed Samsung CD-ROM drive and a generic CD-RW drive (CDR-7S52), oddly the CD-RW drive has problems reading discs burnt on other machines.

Lastly the most important decision when building a DOS gaming pc is the sound card. I wanted good adlib sound in dos, support for General MIDI, Creative Sound Blaster compatibility and some basic 3D sound support. This meant it had to be an ISA card for true DOS support, some PCI sound cards were able to give DOS sound support through emulation but this always comes at a performance cost.

I started with a Sound Blaster 16 CT2230 which worked well until it didn’t. After an hour or so the voice channels on the card would stop leaving only the MIDI output but no adlib sound or PCM samples. This problem couldn’t be solved so I moved onto a Creative Sound Blaster AWE64 Value ISA CT4500 which worked fantastically and had both support for Sound Blaster 16/AWE and SB2.0/Pro. The General MIDI samples on the AWE64 were somewhat lacking and left a lot to be desired.

The solution to the lacklustre MIDI sound was to switch to a sound card with a Wavetable header. I used the ESS Technology Schubert v1.2 with a AudioDrive ES1868F chip. This card ended up sounding fantastic in DOS and the Wavetable header allowed use of any of the Serdaco DreamBlaster daughterboard solutions. I started with the S1 and upgraded to the X2. Here’s some posts I made on the X2 and how it sounded at the time. The ES1868F drivers were simple to setup in DOS and has a fast VXD driver component for Windows 9x.

Tuesday, 3 November 2020

Retro Game Wednesdays (Part 1)

A year of streaming with retro hardware.

On September 27th 2019 I began streaming retro pc games on a variety of systems at twitch.tv/whiskey_juliet. I now do this every Wednesday from around 12 midday until 5.30pm GMT.

Over this last year I’ve worked hard to create a decent setup of hardware and software to allow me to stream some of my favourite games and discover some gems I missed thanks to the suggestions of great community. During this time I’ve done a lot to tweak and improve that setup. Swapping out hardware, changing methods of capture and solving all the usual problems that go hand in hand with old exhausted computers.

I figured it might be sensible to document the details of what I’ve learned along the way, lest I forget some vital step and have to spend hours pulling my hair out trying to remember some odd config.sys setting. As an extra bonus it might be useful to some one else.

1.0 The Systems

First up are the computers themselves. There are three rigs which together allow me to play roughly 30 years of gaming history on their intended hardware without emulation or (that many) technical issues. Each rig is connected via a KVM switch (Keyboard, Video and Mouse). This allows for easy switching between each source, without having to rely on changing OBS/capture settings or constantly having to un-plug and swap hardware.

1.1 Retro Rig #1 (DOS/98)

AMD K6-3+ 450Mhz – CPU
Gigabyte GA-5AA Super Socket 7 – Motherboard
256MB 133Mhz SDRAM – RAM
3DFX Voodoo 3 3000 AGP – GPU
ESS Audiodrive ES1868F ISA – Soundcard
X2 Dreamblaster – MIDI Daughterboard

1.2 Retro Rig #2 (XP)

AMD Athlon 64 X2 4600+ 2.4 GHz – CPU
ASUS A8N-SLI Deluxe – Motherboard
4GB Patriot DDR PC3200 – RAM
ATI Sapphire Radeon HD 7770 PCI-E – GPU
Creative Audigy Platinum PCI – Soundcard
Creative Audigy Front Panel – 5″1/4 Bay

1.3 Retro Rig #3 (XP/7)

Intel Core 2 Quad Q9650 3GHz – CPU
Gigabyte GA-P35-DS3L – Motherboard
8GB OCZ DDR2 PC2-8500 – RAM
ATI Sapphire Radeon HD 7970 PCI-E – GPU
Creative X-Fi Fatal1ty PCI – Soundcard
Creative X-Fi Fatal1ty Front Panel – 5″1/4 Bay

1.4 Stream Rig (Windows 10)

Intel Core i7 3770K – CPU
Asus P8Z77-V LX – Motherboard
16GB DDR3 Vengeance – RAM
Creative X-Fi Fatal1ty PCI – Soundcard
Sapphire Radeon RX 570 8GB PCI-E – GPU
Startech PCIe HD PEXHDCAPVGA Capture Card
DIGITNOW 4K60 Pro PCIeHDMI Capture Card

In the following posts I’ll go into detail on the building and usage of each of these computers. Covering the topics of hardware choices, operating systems, configuration/tweaks and performance.